Sunday, September 1, 2019

TEST DRIVE TIME

After 2 years its time to go for a drive around the shop. My new property is about 10 acres and this truck will be so helpful in cleaning it up.
Haven't started the FC170 in about a year but it was running perfectly last year--just up on blocks cause I DIDNT have brakes.
Test drive went perfect! Photos below.


Wheels And Tires

Now that the brakes are fixed its time for some new rubber!
I like the old school pizza cutter look and I have been searching for new tires for a while. Finally found some Old school pizza cutters with a mudder tread pattern I like and ordered and installed them.
I think they make the truck look vintage and tough which is the look I am going for.
The tires size is 33 inches by 16 inches and they fit on the stock rims no problem.


Checking In On My 2 year old Brake Situation

Front brakes were bad and when I went to bleed them, I broke off the bleeders on both sides. Those bleeders are very tiny. Really put a damper on the project and the truck has been sitting for 2 years! WOW! I can't believe its been that long.
It is time to step up and get this project going again cause I just bought some land and this truck will be great to clear the land with!
So its time for a brake job. Ordered parts and took apart the front hubs and replaced the front wheel cylinders as it was probably time anyway and they have new bleeders that come with them.
New rubber brake lines and front brakes are good to go!!!
Looking forward after 2 years to getting this truck running and driving!

Battery And Battery Cables

Of course the old die hard battery was 5 years old and was dead.
The scary part to me was that as I was taking the battery out the red cable was on the negative post of the battery?
I heard these older vehicles might be positive ground but I then read up and one person online said they had removed there battery and the same!
So I did some research and in 1960 it should have been a negative ground. I guess at the factory they had red cables leftover from when they were positive ground that they were still getting rid of or someone just had that laying around and put it on in the past.
I put the new battery in just I painted the red cable from the factory black and the black cable to the starter from the factory red.
Hopefully this will all work when go to turn over the FC for the first time?

Monday, October 9, 2017

Removing Broken/Stripped Wheel Studs That are Swaged

I was just going to pound out the 2 broken studs in my drivers front hub/drum combo caveman style from the front? BUT I have been reading about the swaged studs in the hubs/drums and I thought twice about it.
I decided I was going to mill out the back of the studs and pound them out the front--from the back side so the swaged area would not get driven though the hole in the hub/drum. It makes sense that the swaged shoulder area should be bigger than the area on the studs with the ridges.
If I drove the stud out the back from the front (if it was swaged) I thought the hole in the hub/drum might get stretched and then the new stud would move if I was tightening the lug nut as the hole in the hub/drum would now be too big?
I have a very small mill that would prolly have done the job but I just got out the grinder and ground out the heads of the 2 problem studs on the backside.
When I got close, I drove the stud a little from the backside toward the front and a little circular crack formed where the stud outline was. I just cleaned that up with the grinder and then finished pounded the stud out the front from the backside.
I really couldn't tell if the stud was swaged when it was in the hub/drum, but my FC seems to be pretty much original and sure enough when the studs were removed you could see the studs were swaged.
The part of the stud with the ridges is .618 and the swaged part is .640. The last picture shows the small size difference between the ridges area and the swaged area. If I would have pounded it out the other way, would it have enlarged the hole in the drum/hub to the point that my new lug would have spun in the hole? I don't know, because a lot of people seem to just pound them out the front?


Problem hub/drum with 2 bad studs
Grinding out the back and the outline of the stud can be seen here.


Above you can see the slight difference in size between the swaged area and the ridges area on the stud.


Saturday, September 30, 2017

Rusted/Broken Front Brake Bleeders creating a major hassle

Things were going pretty well. Engine is running great and all driveline mechanicals appear to be working. Bummer is that I cant go anywhere because the brakes are out. I ordered new rubber lines for the front brakes since one was covered with electrical tape and prolly leaking.
When going to install the front rubber lines I noticed the front brake bleeders are rusted and sheared off.
This put a major damper on my project and is creating a big learning curve for me, as I don't know jack about axles/hubs/etc.
So now I am learning about the FC170 front axles/driveline.
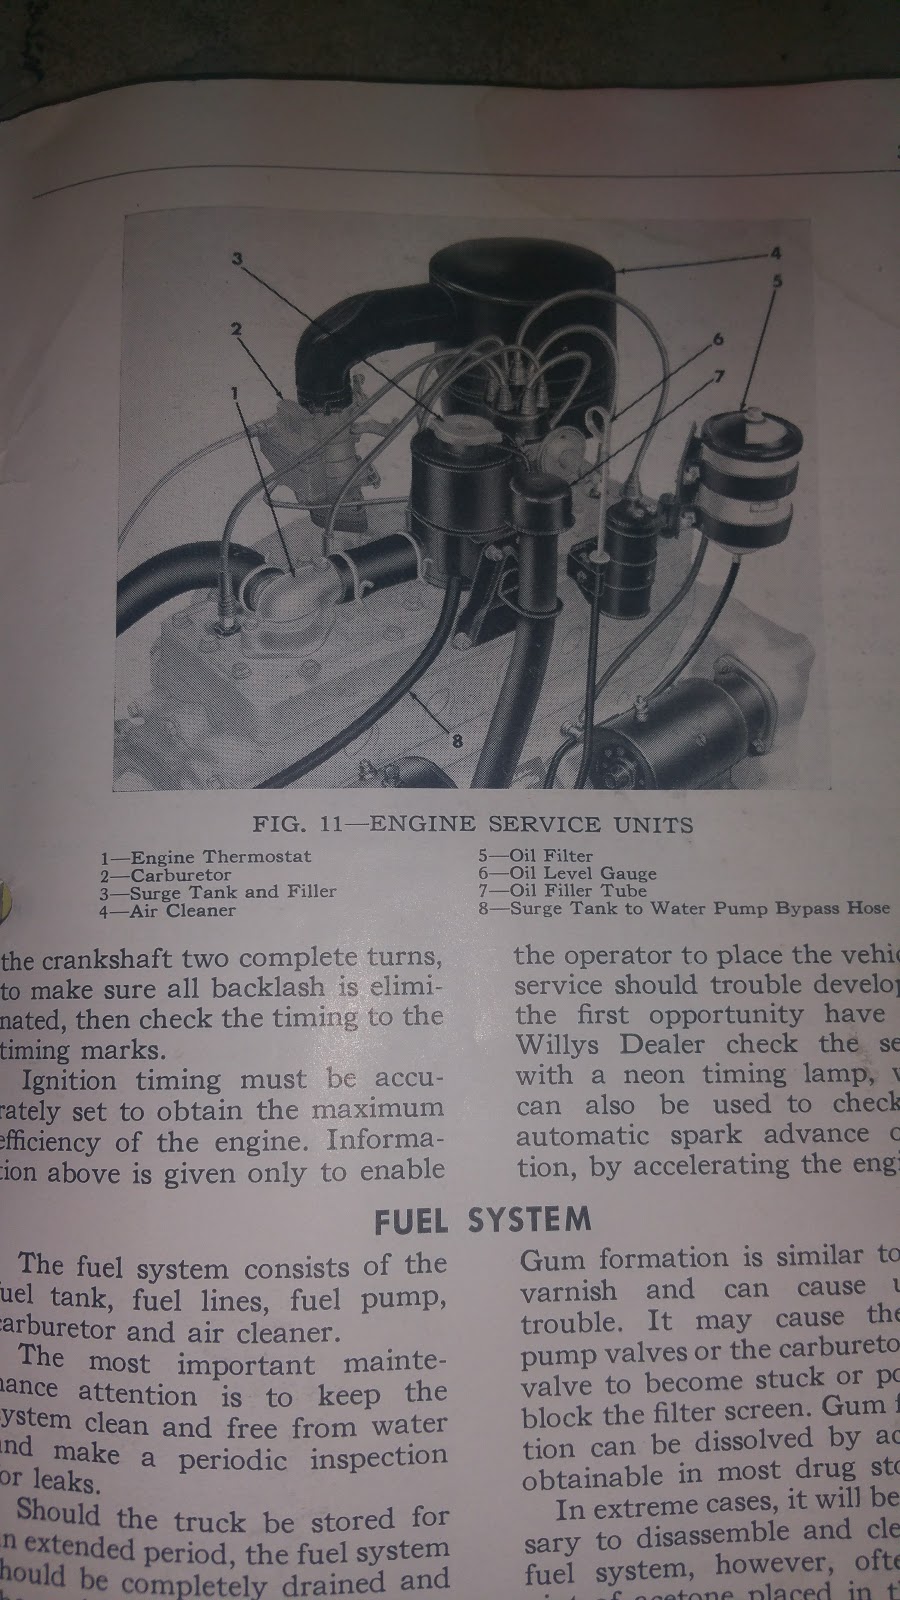
A great suggestion from the Forward Forum to get the FC service manual has me heading in the right direction.
Looks like I am going to have to take off/apart the entire front wheel drive assemblies to get the hub/drum off so I can replace the wheel brake cylinders (since they will have new unrusted brake bleeders on them). That pretty much sucks if you ask me. Simple thing like rusted brake bleeders is going to cause alot of work and additional time before I can be on the road. But since I can't drive it without brakes, I really don't have a choice.
I have Warn M2 manual locking hubs on the front axles of the FC.  Best I can tell from online research is that these hubs are very early versions made by Warn when they were just getting the company  going in the late 50's, early 60"s. Not much info on them on the web. 
I have been soaking the entire front hub/wheel assembly in PB blaster and I went ahead and unbolted the Warn hub today. There are 6-9/16 inch bolts on the face of the Warn M2 locker. Getting the bolts off wasn't too bad.
The manual locker did have a little oil in it and I don't know if that oil is leaking past the axle seal or was put there on purpose to lube the little pins in the Warn M2 locker?
No gaskets were placed on the locker faces (which are supposed to be there according to the factory Warn specification) and the washers that are supposed to be tabbed to lock the Warn hub bolts in place were substituted by regular washers by the previous owner. Surprisingly to me, it wasn't leaking oil through to the outside, so I guess that wasn't too bad.
Removing the locking hub body reveals the axle and the interior factory locking nuts. The previous owner had been doing the chisel thing I read about online to get the interior nuts off the inside assembly. Not cool.
Since I don't have the proper interior axle nut socket either (and there were already divets in  the nut from the previous chisel method) I tried to get the interior nuts off with the amatuer chisel method and got them off-whatever. 
I am going to order the right socket so I can tension the bearing assembly properly when I do the final reinstallation.
So now the entire drum/hub assembly seems loose and I could have prolly pulled the whole thing off.
Chickened out cause I don't understand how the bearings are in the housing and how the oil seal works, so I'm at a stop for now.


Sunday, September 24, 2017

Qwicky Paint Job

Weather has been good here in Virginia for a while so I started prepping and did a quick paint job on the old beast.
Wanted to stick with a shade of green since it was green originally.  Also, there were already black bumpers and trim so I added some more black to the cab, fenders, etc. to bring it all together and make it look tougher.
What do you all think?


Wednesday, September 20, 2017

Pilkington Glass For the WIN-New windshield picked up today

Unfortunately my windshield had a large hole in it. Ordered a new windshield from Pilkington Glass. Curt in the classic car division was great and got my new windshield to the Springfield, Va Pilkington local distribution center quick.
The wharehouse guy was super friendly and professional. We checked the glass (which was well packed),  loaded it, and I drove it back to my shop in my Excursion.
Photos of the Pilkington local distribution center and the size of the box the windshield comes in below.
Glass was lighter than I expected and one strong person can move it around out of the packing box it comes in with no problem.
Great experience with Pilkington Classics!


Thursday, September 7, 2017

Rear Brakes

I have approximately 11 by 2 inch thick brakes.
The drums are behind the hubs? Are these pressed on lugs?
I thought they were only pressed on for the older versions?
Mine is a 1960 model year.


Monday, September 4, 2017

Cooling System radiator, surge tank, hoses, thermostat

Photos of the routing for the cooling system. Radiator, hoses, sure tank. The arrows don't indicate flow of any fluids. They are just pointing to the direction of the item described by the label.


Saturday, September 2, 2017

FC 170 manual and specifications

Fortunately I got the original user manual with my FC170. Sweeeet!!!
I found a Jeep manual online that had some general information that was helpful but was not vehicle specific to my FC 170, so I have been a little confused as to many details related to my truck. Manual is pretty decent but the tables and photo lables are small. Hopefully, clicking on the photos will make them big enough to see the information.
The manual doesn't have detailed servicing information and I don't know if a FC170 specific service manual is available?


Friday, September 1, 2017

FC 170 made it to my shop

Picked up this 1960 Willys Jeep FC 170 in Pennsylvania.
Needs a lot of work but I am hoping the mechanicals are not too bad.
Best I can tell is that this truck is a 1960 FC170 wide track with the updated cab (with the improved cooling tunnel).
This is a four wheel drive vehicle with 3 speed manual transmission and hi/low transfer case.
Seems like the truck and other accessories are pretty much stock.
The brakes are drum (front and back) and the under dash mounted e-brake is connected to the rear drums though a cable that splits into 2 cables halfway under the bed. These 2 cables then go to the back drums.
This truck has a snow plow option with an included plow.
Was told the vehicle was running when parked under a carpet years ago.
When I bought it we pushed it onto my tow trailer with a small tractor. Transmission went into nuetral fine and vehicle rolled up onto the tow trailer without incident.
Restoration plan is to sand body rust, epoxy seal, gut interior, get varnish out of gas tank, drain and replace all fluids/filters, open spark plug holes and fill engine with Marvel mystery oil prior to turning over by hand.
Will post updates to this blog as I make progress. This will be a restomod project. I do plan on driving it. I will update the necessary parts for functionality purposes and looks-not for period correct restoration.
This a hobby for me so feel free to contact me if I can help with your FC project or if u see something I need to address as I am not an expert in these vehicles.
For anybody reading here the best resources I have found for Willys Jeep FCs are the Forward Forum and the Forward Connection.